Are you curious about plank variations for beginners and how they can boost your fitness?
Planks are one of the most efficient exercises to strengthen your core, improve posture, and build overall body conditioning.
The beauty of planks is that they’re simple to learn, require no special equipment, and can be modified to suit your fitness level.
If you’re new to planks, you might be wondering where to start or how to make them a regular part of your routine. Don’t worry; you’re in the right place.
Planks are more than just a core workout—they work your entire body, engaging muscles from your shoulders to your toes. When done correctly, they can help you build strength, balance, and endurance.
But here’s the best part: you don’t have to stick to just one type of plank. There are numerous variations to explore, each offering unique benefits and challenges.
This guide will walk you through the different plank variations for beginners, providing step-by-step instructions and helpful tips to ensure you get the most out of your plank workouts.
By the end of this guide, you’ll feel empowered to incorporate planks into your fitness routine and make steady progress toward your fitness goals.
What are planks?
- Planks are a type of bodyweight exercise that requires you to hold your body in a stable, straight position, much like a plank of wood. To perform a plank, you need to engage your core muscles while keeping your body aligned from head to heels. Planks can be done in various ways, such as on your forearms or hands, and are a common exercise in fitness routines due to their simplicity and effectiveness.
Why should beginners start with planks?
- Planks are an excellent exercise for beginners for several reasons. First, they are straightforward to learn and don’t require any special equipment, making them accessible to everyone. Second, planks focus on core strength, which is essential for overall body stability and injury prevention. Strong core muscles help improve posture, balance, and coordination, which can be beneficial in daily life and other physical activities. Additionally, planks engage multiple muscle groups, including the shoulders, arms, chest, and legs, providing a comprehensive workout. This makes planks an efficient choice for beginners who want to build a solid foundation without feeling overwhelmed by complex exercises.
Benefits of Planks
Core Strength
- When you perform a plank, you’re engaging your core muscles, which consist of your abs, lower back, hips, and pelvis. This group of muscles plays a crucial role in stabilizing your body and supporting your spine. By doing planks regularly, you’re strengthening this entire core region, which helps you maintain balance and stability. Strong core muscles make it easier to perform other exercises, sports activities, or even daily tasks like bending over to tie your shoes or carrying heavy groceries. Plus, a strong core can reduce the risk of back injuries and improve overall athletic performance.
Improved Posture
- Planks are excellent for improving your posture because they require you to hold your body in a straight line from head to heels. This alignment trains your muscles to support your spine correctly, which can reduce slouching and promote a more upright position. Improved posture isn’t just about looking better; it can also help alleviate neck and shoulder pain, which are often caused by poor posture. With a stronger core from planks, you’ll likely find it easier to sit or stand for extended periods without discomfort.
Overall Body Conditioning
- Although planks are often associated with core strength, they provide a full-body workout. When you hold a plank, your arms, shoulders, chest, and even legs are all engaged to keep your body in the correct position. This means that planks not only build core strength but also help tone and strengthen other muscle groups. The overall body conditioning that comes with planks can improve your muscle endurance, support weight loss, and contribute to a more balanced fitness routine. Additionally, planks can be done anywhere, making them a convenient option for getting a full-body workout without needing special equipment or a gym membership.
Safety Tips for Beginners
- Warm-up Exercises
Before you get into planks, it’s essential to warm up your muscles and get your blood flowing. A good warm-up helps prepare your body for the workout, reducing the risk of injury. You don’t have to do anything too intense—a few minutes of light cardio like jogging in place, jumping jacks, or brisk walking will do the trick. Add some dynamic stretches, like arm circles and leg swings, to help loosen your joints and improve your range of motion. A proper warm-up sets the stage for a safer and more effective plank session.
- Proper Plank Form
Proper form is key to getting the most out of planks and avoiding strain on your body. When you hold a plank, ensure your body forms a straight line from head to heels. Keep your shoulders directly above your elbows or hands, and don’t let your hips sag or lift too high. Engage your core by tightening your abs and glutes, and keep your head in a neutral position, avoiding the temptation to look up or down. Proper form ensures that you’re targeting the right muscles and not putting undue stress on your spine or shoulders.
- Common Mistakes to Avoid
Beginners often make a few common mistakes when learning planks. One of the most frequent is letting the hips drop, which can strain the lower back. To avoid this, focus on engaging your core and keeping your body in alignment. Another common mistake is lifting the hips too high, which shifts the work from the core to the shoulders, reducing the effectiveness of the exercise. Additionally, avoid holding your breath—steady breathing helps maintain stability and endurance. Don’t overdo it. If you feel sharp pain or excessive discomfort, it’s a sign to stop and reassess your form or take a break. By avoiding these common mistakes, you’ll get more out of your plank practice and stay safe while doing it.
Basic Plank Position
- How to Set Up Your Plank
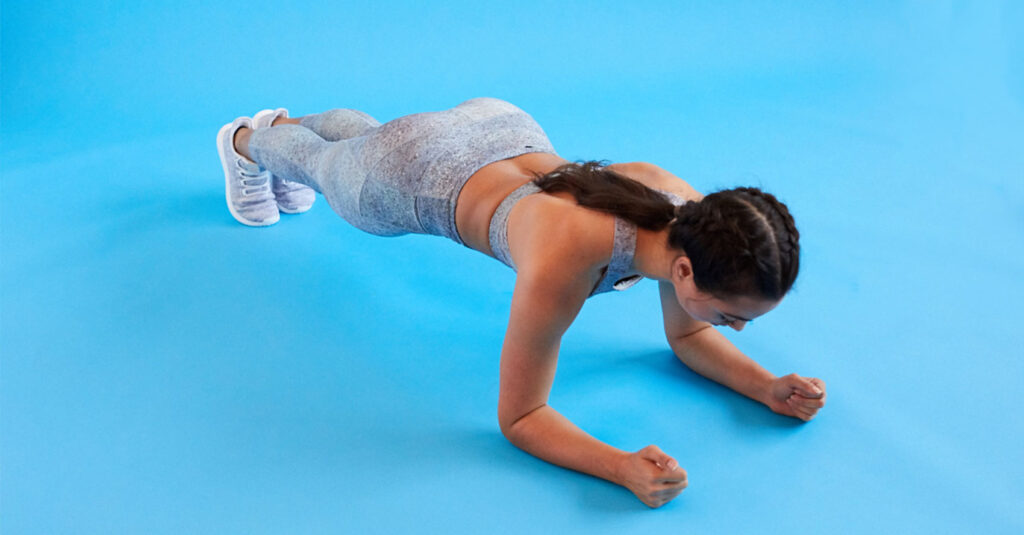
To set up a basic plank, start by lying face down on the floor. Position your forearms on the ground with your elbows directly under your shoulders. Your forearms should be parallel to each other, and your hands can either be flat on the floor or clasped together—whatever feels more comfortable. Tuck your toes under and engage your core by tightening your abdominal muscles. As you lift your body off the ground, keep a straight line from your head to your heels. This means your hips shouldn’t be sagging or sticking up too high. Make sure your shoulders are relaxed and not shrugged towards your ears, and keep your head in a neutral position, looking down to maintain alignment with your spine.
- How Long to Hold It
The length of time you should hold a plank depends on your fitness level. As a beginner, start with shorter durations to build strength and focus on proper form. Aim for 10-15 seconds on your first attempt. If that feels comfortable, gradually increase your hold time by 5-10 seconds with each session. The goal is to hold the plank without compromising your form. Once you’re able to maintain a plank for about 30 seconds without dropping your hips or straining, you’re on the right track. It’s better to hold a plank with correct form for a shorter duration than to hold it for a longer time with poor alignment. As you gain strength and confidence, you can aim for longer holds, with a typical target being around one minute for a basic plank. Remember, quality over quantity—perfect your technique, and the time will naturally increase.
Forearm Plank
Step-by-step Guide
- The forearm plank is a classic variation and a great starting point for beginners. Here’s a step-by-step guide to help you get into the correct position:
- Start by lying face down. Begin by lying on your stomach, with your legs extended and your toes pointed into the ground.
- Position your forearms. Place your forearms on the floor, ensuring your elbows are directly beneath your shoulders. Keep your forearms parallel, with palms facing down or hands clasped together.
- Lift your body. Engage your core and slowly lift your body off the ground, keeping a straight line from your head to your heels. Your weight should be supported by your forearms and toes.
- Align your body. Make sure your hips aren’t sagging or sticking up too high. Your back should be flat, and your head should be in a neutral position, looking down to maintain proper alignment with your spine.
- Hold the position. Once you’re in position, hold the plank, keeping your core tight and your body straight.
Tips for Success
- To get the most out of your forearm plank, consider these tips for success:
- Focus on form. Always prioritize proper form over duration. If you start to feel your hips sag or your back arch, take a break and reset.
- Engage your muscles. Tighten your abs and glutes to help keep your body stable. This engagement is crucial to getting the most benefit from the exercise.
- Breathe steadily. Keep your breathing consistent and avoid holding your breath. Steady breaths will help you maintain your endurance during the plank.
- Start with shorter holds. If you’re new to planks, begin with shorter durations—10 to 15 seconds is a good starting point. As you build strength, gradually increase the time you hold the plank.
- Listen to your body. If you feel pain or significant discomfort, it’s time to stop. It’s normal to feel some strain, but sharp pain could indicate improper form or overexertion.
With these tips in mind, you’ll be on your way to mastering the forearm plank and building a strong core. Keep practicing and be patient with your progress—you’ll get stronger over time.
High Plank
Step-by-step Guide
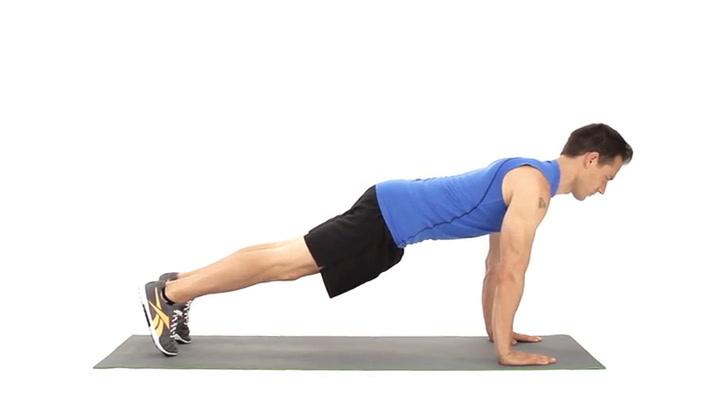
The high plank is often referred to as the “top” position of a push-up. Here’s a step-by-step guide to help you perform a high plank correctly:
- Start in a push-up position. Begin on your hands and knees, with your hands shoulder-width apart and your knees under your hips.
- Extend your legs. Straighten your legs behind you, resting on the balls of your feet. Your weight should be evenly distributed between your hands and toes.
- Align your body. Keep a straight line from your head to your heels. Your shoulders should be directly above your wrists, and your hips should not sag or rise too high. Ensure that your head remains in a neutral position, looking down at the floor.
- Engage your core. Tighten your abdominal muscles and glutes to keep your body stable. This engagement helps maintain the straight line and prevents stress on your lower back.
- Hold the position. Maintain the high plank for as long as you can while keeping proper form. Start with shorter holds (15-20 seconds), and gradually increase the duration as you build strength and endurance.
How it Differs from Forearm Plank
The high plank and forearm plank are similar in that they both require you to hold a straight line from head to heels, engaging your core and other muscles for stability. However, they differ in a few key ways:
- Hand Position: In the high plank, you’re supporting your body weight with your hands, which are shoulder-width apart. In the forearm plank, you support yourself on your forearms, with your elbows directly beneath your shoulders.
- Arm Engagement: The high plank involves more upper body engagement, particularly in the arms, shoulders, and chest. This makes it slightly more challenging for beginners who might have less upper body strength.
- Stability: The forearm plank provides more stability because of the wider surface area of the forearms. The high plank requires more balance, which can be beneficial for building shoulder and core strength.
- Ease of Transition: The high plank can transition easily into other exercises, like push-ups, making it a versatile starting point for more complex movements. The forearm plank is generally more static.
Both types of planks offer excellent benefits, but the high plank might require more upper body strength and balance, while the forearm plank can be more accessible to beginners. You can choose the one that suits your current fitness level or incorporate both into your routine for a balanced approach.
Knee Plank
Step-by-step Guide
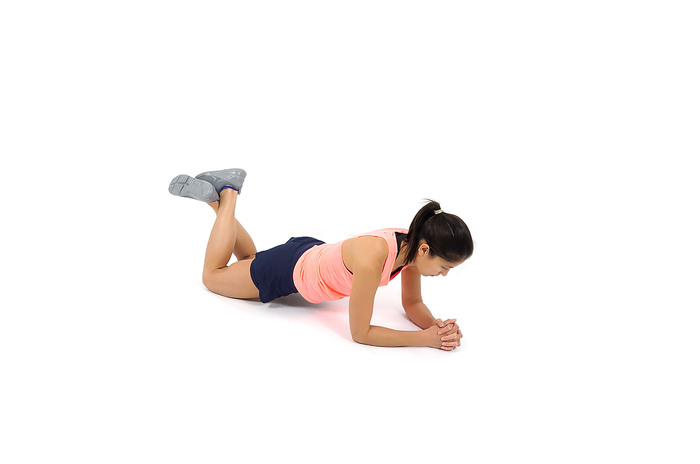
The knee plank is a great option for beginners who want to build core strength without placing too much strain on their back or shoulders. Here’s a step-by-step guide to help you perform a knee plank:
- Start on all fours. Begin on your hands and knees, with your hands shoulder-width apart and knees hip-width apart. Ensure your back is straight and your core is engaged.
- Adjust your position. Move your hands forward slightly to align your shoulders directly above your wrists. Your knees should be behind your hips, creating a slight angle in your back.
- Engage your core. Tighten your abdominal muscles and glutes, creating a straight line from your head to your knees. Keep your head in a neutral position, looking down at the floor.
- Lift your feet. To enter the knee plank position, lift your feet off the ground so that your weight is supported by your knees and hands.
- Hold the position. Maintain the plank position for as long as you can while keeping proper form. Start with shorter holds (15-20 seconds) and gradually increase the duration as you build strength and confidence.
Modifications for Comfort
The knee plank can be modified to make it more comfortable, especially if you’re just starting or have certain physical limitations. Here are some suggestions for making the knee plank more comfortable:
- Use a Mat or Cushion: If your knees are sensitive or you experience discomfort, place a yoga mat or towel under your knees for added cushioning. You can also use knee pads for extra protection.
- Adjust Your Arm Position: If you find the high plank position on your hands too intense, try bending your elbows slightly to reduce strain on your wrists. This adjustment can make the knee plank feel more comfortable.
- Take Breaks: If holding the knee plank becomes too challenging, take a brief break, then return to the position. This approach allows you to build endurance without overexerting yourself.
- Keep It Shorter: If you’re struggling with longer holds, start with shorter durations and focus on maintaining proper form. Gradually increase the time as you gain strength and confidence.
The knee plank is a fantastic stepping stone to more advanced planks, offering a lower-impact alternative while still providing significant benefits to your core. With these modifications, you can make the knee plank work for you, ensuring a comfortable and effective workout.
Side Plank
Step-by-step Guide
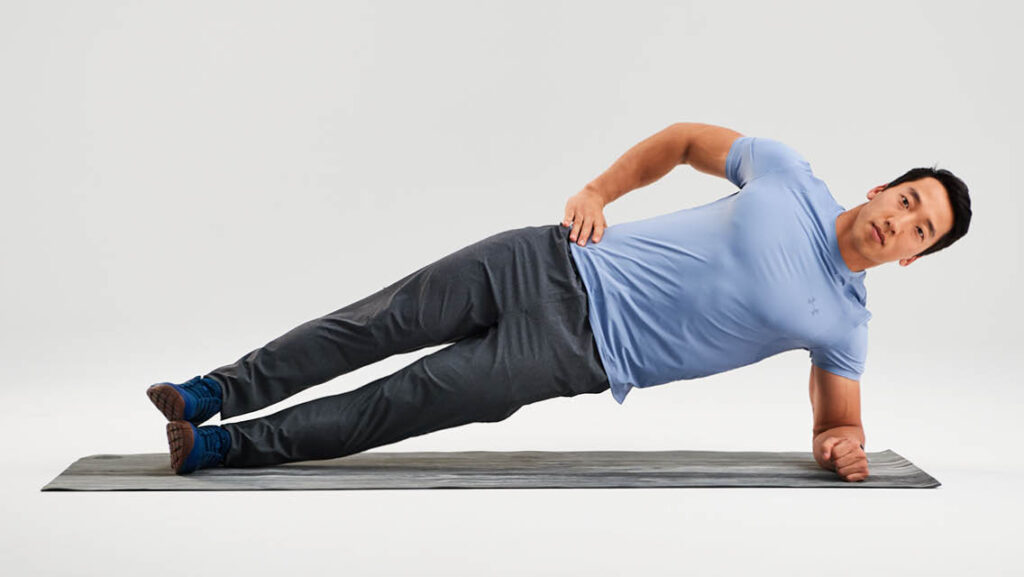
The side plank is a variation that targets your obliques, the muscles along the sides of your core. Here’s a step-by-step guide to help you perform the side plank correctly:
- Start on your side. Lie on your side with your legs extended, one on top of the other. Align your body in a straight line from head to heels.
- Position your elbow. Place your lower arm on the floor, with your elbow directly beneath your shoulder. Your forearm should be flat on the ground, perpendicular to your body.
- Lift your hips. Engage your core and push up through your forearm to lift your hips off the ground. Keep your body in a straight line, avoiding sagging or bending at the waist.
- Position your top arm. You can place your top hand on your hip or extend it toward the ceiling for added balance. Choose the position that feels most stable for you.
- Hold the position. Maintain the side plank for as long as you can while keeping proper form. Start with shorter holds (10-15 seconds) and gradually increase the duration as you build strength. Repeat on the other side.
How to Maintain Balance
Maintaining balance in the side plank can be challenging, especially if you’re new to the exercise. Here are some tips to help you stay steady:
- Focus on Alignment: Keep your body in a straight line from head to heels. Avoid letting your hips sag or lifting them too high, as this can throw off your balance.
- Engage Your Core: Tightening your abdominal muscles and glutes helps stabilize your body. This engagement is crucial for maintaining balance during the side plank.
- Use Your Top Arm for Support: If you’re struggling with balance, place your top hand on your hip or extend it toward the ceiling. This can help distribute your weight and keep you steady.
- Start with Bent Knees: If the full side plank is too challenging, try bending your lower knee and keeping it on the ground. This modification reduces the load on your core and makes it easier to maintain balance.
- Practice and Progress: Balance improves with practice, so start with shorter holds and work your way up. As you gain confidence, try extending your top leg or arm for an additional challenge.
By following these steps and tips, you’ll be able to perform the side plank effectively and maintain balance, allowing you to target your obliques and strengthen your core.
Plank to Push-Up
Step-by-step Guide
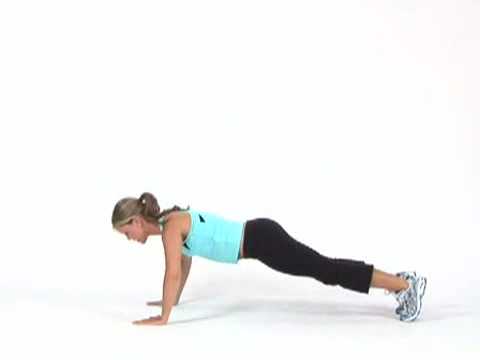
The plank-to-push-up is an advanced variation that transitions between a forearm plank and a high plank. It targets your core, shoulders, and triceps. Here’s how to do it:
- Start in a forearm plank. Get into the forearm plank position, with your elbows directly under your shoulders and your body in a straight line from head to heels.
- Prepare to transition. Engage your core and position your feet slightly wider than shoulder-width apart. This helps with stability during the transition.
- Rise to high plank. Start by pressing up with one arm, placing your hand where your elbow was. Follow with the other arm to end in a high plank position. Keep your hips and shoulders square to the ground.
- Return to forearm plank. From the high plank, lower back down, one arm at a time, to return to the forearm plank. Maintain a straight line with your body and avoid letting your hips sag.
- Repeat the transition. Continue to alternate between forearm plank and high plank. Aim for 5-10 transitions to start, depending on your fitness level.
Transition Tips
The key to a successful plank to push-up transition is maintaining stability and control. Here are some tips to help you make smooth transitions:
- Engage your core. Keep your abdominal muscles tight throughout the movement to maintain a straight line from head to heels.
- Use a steady rhythm. Find a consistent pace that allows you to maintain control. Avoid rushing through the transitions, as this can lead to poor form or increased risk of injury.
- Keep your shoulders square. During the transition, try to keep your shoulders level and avoid rotating your body. This helps distribute the work evenly and prevents strain on one side.
- Alternate your leading arm. To avoid overworking one side, switch which arm leads the transition each time. This ensures balanced muscle engagement.
- Breathe steadily. Don’t forget to breathe! Inhale as you move into the high plank, and exhale as you return to the forearm plank. This helps keep your movements smooth and controlled.
With these steps and tips, you’ll be able to perform the plank to push-up transition with confidence and ease, adding a challenging and effective exercise to your workout routine.
Plank with Leg Lift
Step-by-step Guide
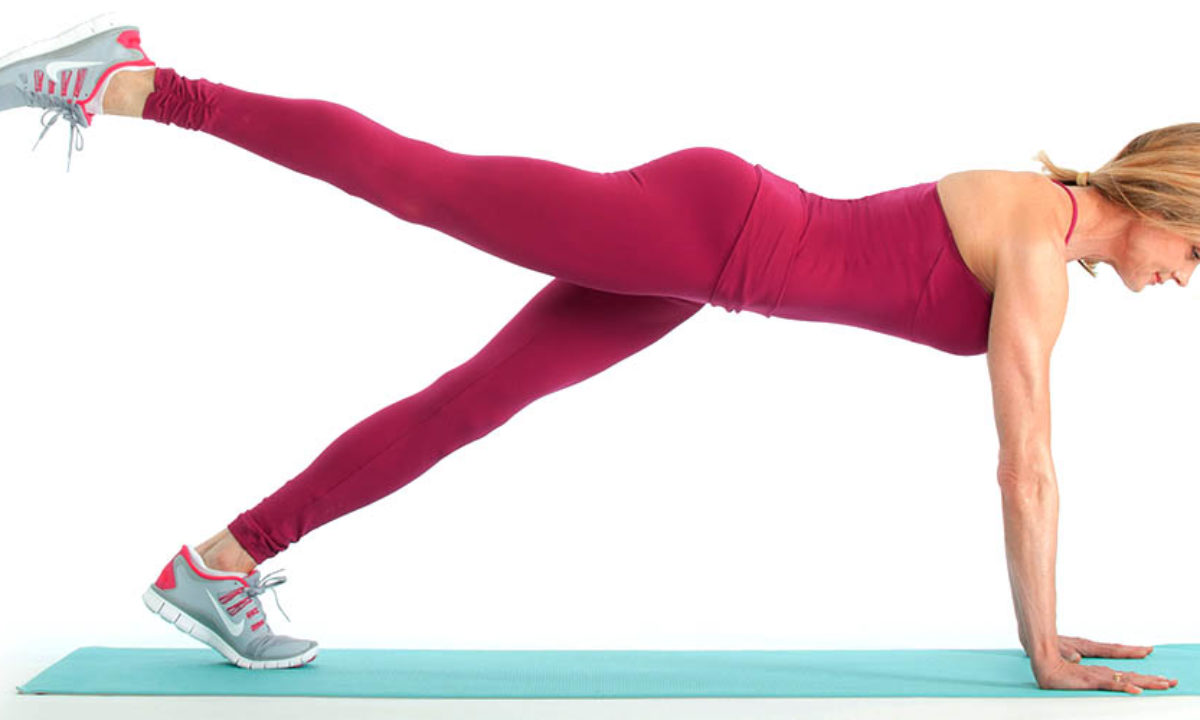
The plank with leg lift is a challenging variation that adds an extra focus on your glutes and hamstrings while maintaining the core engagement of a traditional plank. Here’s a step-by-step guide to help you perform the plank with leg lift:
- Start in a high plank. Get into the high plank position with your hands shoulder-width apart and your body in a straight line from head to heels. Your shoulders should be directly above your wrists.
- Engage your core. Tighten your abdominal muscles and glutes to stabilize your body and keep your hips from sagging.
- Lift one leg. While maintaining the plank position, slowly lift one leg off the ground. Keep it straight and raise it to about hip height. The lift doesn’t have to be high; focus on keeping your body aligned.
- Hold and lower. Hold the leg in the lifted position for a couple of seconds, then slowly lower it back to the starting position. Repeat with the other leg.
- Alternate lifts. Continue alternating leg lifts, aiming for 5-10 lifts per leg. Focus on smooth and controlled movements, and maintain a steady rhythm.
Benefits for the Lower Body
The plank with leg lift is an excellent way to target your lower body while still engaging your core. Here are some benefits this exercise offers:
- Strengthens Glutes and Hamstrings: By lifting your leg, you’re activating your glutes and hamstrings, two key muscle groups in the lower body. This exercise can help tone and strengthen these muscles, contributing to a more defined lower body.
- Improves Core Stability: As you lift one leg, your core has to work harder to maintain balance and alignment. This added challenge can enhance your core strength and stability, which is crucial for overall fitness and injury prevention.
- Engages Multiple Muscle Groups: In addition to the core and lower body, the plank with leg lift engages your shoulders, arms, and back to maintain the plank position. This full-body engagement makes the exercise highly effective and efficient.
- Enhances Coordination and Balance: The movement of lifting one leg while holding a plank requires balance and coordination. Practicing this exercise can help improve these skills, benefiting other exercises and daily activities.
- Low-Impact Exercise: Despite its challenging nature, the plank with leg lift is low-impact, making it suitable for those who want to avoid high-impact exercises. It’s a great option for building strength without placing excessive stress on joints.
With this guide and understanding of the benefits, you’ll be ready to add the plank with leg lift to your workout routine, helping you target both your core and lower body for a comprehensive exercise experience.
Plank with Arm Reach
Step-by-step Guide
The plank with arm reach is a variation of the classic plank that adds an extra challenge to your core and upper body. Here’s a step-by-step guide to performing the plank with arm reach:
- Start in a high plank. Get into the high plank position with your hands shoulder-width apart and your body forming a straight line from head to heels. Make sure your shoulders are directly above your wrists, and your feet are about hip-width apart.
- Engage your core. Tighten your abdominal muscles and glutes to maintain stability and keep your hips from sagging or lifting too high.
- Reach with one arm. Keeping your body aligned, extend one arm forward, reaching straight ahead. Your other hand and feet should remain stable to support the movement.
- Return to the starting position. After reaching forward, bring your arm back to its original position in the high plank. Repeat with the other arm.
- Alternate arm reaches. Continue alternating arm reaches, aiming for 5-10 reaches on each side. Keep the movements smooth and controlled, and focus on maintaining a steady rhythm and proper form.
Core Stability
The plank with arm reach is a fantastic exercise for improving core stability. Here’s how this variation enhances your core strength and stability:
- Increased Core Engagement: By reaching forward with one arm, you’re adding an element of instability to the plank. This requires your core muscles to work harder to maintain balance and prevent your hips from rotating.
- Enhanced Balance and Coordination: The movement of reaching forward while maintaining a plank position helps improve your balance and coordination. This can benefit other exercises and activities that require stability and control.
- Strengthens Upper Body and Shoulders: Along with the core, the plank with arm reach engages your shoulders, arms, and upper back. This makes the exercise effective for strengthening the upper body while maintaining a strong core.
- Targets Multiple Muscle Groups: This variation engages various muscle groups, from the core to the shoulders and even the legs. By keeping your body stable while reaching forward, you’re building strength and endurance across a broad range of muscles.
- Promotes Better Posture: The focus on core stability and upper body strength can lead to improved posture. As you strengthen your core and shoulders, you may find it easier to maintain an upright position throughout the day.
By incorporating the plank with arm reach into your workout routine, you’ll not only build core stability but also improve overall strength and coordination, making it a valuable addition to any fitness plan.
Plank Variations for a Full-Body Workout
Combining Planks for a Full Routine
Planks are incredibly versatile, allowing you to mix and match different variations to create a full-body workout. By combining several types of planks, you can target a range of muscle groups and keep your workouts engaging. Here’s an example of a routine that incorporates various plank variations:
- Forearm Plank: Start with a forearm plank for 30 seconds. This will activate your core and set the foundation for the rest of the workout.
- Side Plank: Hold a side plank for 15-20 seconds on each side. This exercise engages your obliques and helps with balance and stability.
- High Plank: Transition to a high plank and hold for 30 seconds. This position strengthens your shoulders and arms while maintaining core engagement.
- Plank with Leg Lift: Perform 5-10 leg lifts on each side from the high plank position. This movement targets your glutes and hamstrings.
- Plank with Arm Reach: From the high plank, do 5-10 arm reaches on each side to engage your upper body and enhance core stability.
- Plank to Push-Up: Complete 5-10 plank-to-push-up transitions to strengthen your triceps and shoulders.
This combination of planks provides a comprehensive workout that targets your core, upper body, and lower body. It can be completed in 10-15 minutes, making it a quick and effective way to get a full-body workout without needing any equipment.
How to Progress Over Time
Progression is key to seeing results and avoiding workout plateaus. To ensure continued improvement, here are some tips on how to progress over time with plank variations:
- Increase Hold Times: As you get stronger, gradually increase the duration of your planks. Start by adding 5-10 seconds to each hold, working toward longer holds while maintaining proper form.
- Add More Variations: Incorporate additional plank variations into your routine to keep things interesting and challenge different muscle groups. Try side planks with leg lifts or plank-to-push-up transitions to add intensity.
- Combine Planks with Other Exercises: To create a more comprehensive workout, combine plank variations with other exercises like squats, lunges, or push-ups. This mix can provide a well-rounded workout routine.
- Use Weights or Resistance Bands: For an added challenge, consider incorporating light weights or resistance bands into your plank routine. This can increase the resistance and help build more muscle strength.
- Consistency is Key: To see progress, maintain a consistent workout schedule. Aim to do your plank routine 2-3 times per week, allowing for rest and recovery in between.
By combining different plank variations into a full-body workout and progressing over time, you’ll be able to build strength, improve endurance, and enhance overall fitness. Keep challenging yourself, and don’t be afraid to try new variations to keep your workouts fresh and engaging.
Challenges and Common Problems
Common Issues Faced by Beginners
Planks are simple in theory, but beginners often encounter a range of challenges when starting out. Here are some of the common issues that beginners face when doing planks:
- Sagging Hips: One of the most frequent problems is when the hips start to sag, which can put strain on the lower back. This often happens due to a lack of core strength or improper form.
- Lifting Hips Too High: On the flip side, some people lift their hips too high, creating a peak instead of a straight line from head to heels. This can reduce the effectiveness of the plank.
- Shoulder Pain: Holding the plank position can sometimes lead to shoulder discomfort, especially if the shoulders are not aligned properly with the elbows or wrists.
- Neck Strain: Looking too far up or down during a plank can cause neck strain, leading to discomfort or pain.
- Breath Holding: Beginners sometimes hold their breath while planking, which can cause unnecessary tension and reduce endurance.
- Overexertion: Trying to hold a plank for too long without proper conditioning can lead to muscle fatigue and poor form, increasing the risk of injury.
Solutions and Advice
If you’re experiencing any of these common problems, don’t worry—there are solutions to help you overcome these challenges and improve your plank practice:
- Focus on Proper Form: To avoid sagging hips or lifting them too high, concentrate on maintaining a straight line from head to heels. Engage your core and glutes to keep your body aligned. If you’re unsure, use a mirror or ask a friend to check your form.
- Correct Shoulder Alignment: To reduce shoulder pain, make sure your shoulders are directly above your elbows (in a forearm plank) or wrists (in a high plank). Keep your shoulders relaxed and avoid shrugging them toward your ears.
- Keep Your Head Neutral: To prevent neck strain, keep your head in line with your spine. Look down at the floor, not up at the ceiling or too far ahead.
- Breathe Consistently: Don’t hold your breath while planking. Instead, breathe steadily and deeply. This will help you maintain endurance and keep your muscles relaxed.
- Start with Shorter Durations: If you’re experiencing overexertion or muscle fatigue, try holding the plank for shorter durations and gradually increase the time as you build strength.
- Use Modifications: If the full plank is too challenging, consider using modifications like the knee plank or side plank with a bent knee. These adjustments can help you build strength and confidence without overexerting yourself.
By addressing these common problems and following these solutions and advice, you’ll be able to improve your plank technique and make steady progress in your fitness journey. Remember, it’s not about perfection—it’s about consistent practice and maintaining proper form.
Conclusion
Planks are one of the most effective exercises for building core strength, improving posture, and achieving overall body conditioning. They are versatile, easy to learn, and can be done without any equipment. By incorporating planks into your fitness routine, you’re investing in a solid foundation that benefits your entire body. Whether you’re new to fitness or looking to enhance your core strength, planks offer a simple yet powerful way to achieve your goals. The key is to focus on proper form, consistency, and gradual progression.
If you’re just starting with planks, remember that progress takes time. It’s normal to find them challenging at first, but don’t get discouraged. Each time you practice, you’re building strength and resilience. Keep going, even if you start with shorter durations and easier variations. As you gain strength and confidence, you’ll notice improvements in your posture, core stability, and overall fitness. Celebrate the small victories, like holding a plank for a few seconds longer or mastering a new variation. Keep practicing, and you’ll be amazed at how far you can go. Remember, every second you spend in a plank is a step toward a stronger, healthier you.
Keep challenging yourself, stay consistent, and enjoy the journey. With dedication and practice, you’ll make steady progress and achieve your fitness goals. Good luck, and happy planking!
FAQs
- How often should I do planks as a beginner?
As a beginner, aim to do planks 2-3 times per week. This frequency gives your muscles time to recover between sessions while building strength and endurance. It’s okay to start with shorter durations and work your way up as you progress.
- What’s the best plank variation for beginners?
The forearm plank is a great starting point for beginners because it offers a stable position and is easier on the wrists compared to the high plank. From there, you can explore other variations like the high plank, knee plank, and side plank, depending on your comfort and fitness level.
- How can I improve my plank duration?
To increase your plank duration, focus on proper form and engage your core muscles. Start with shorter holds and gradually add 5-10 seconds each time you plank. Consistency is key, so practice regularly and be patient with your progress.
- Is it normal to feel discomfort while planking?
Some discomfort is normal, especially when your muscles are working hard. However, sharp pain or excessive strain is not. If you experience pain in your lower back, shoulders, or neck, check your form and consider using modifications like the knee plank. If discomfort persists, it’s best to consult a fitness professional or healthcare provider.
- Can planks help with weight loss?
Planks can be part of a weight loss plan because they engage multiple muscle groups and increase muscle mass, which can boost metabolism. However, weight loss also depends on other factors like diet and overall physical activity. To lose weight, it’s important to combine planks with a balanced diet and a consistent exercise routine that includes cardio and strength training.
These FAQs provide useful insights for beginners and address common questions related to planks. If you have additional questions or need more guidance, feel free to ask—I’m here to help.
